关于 MogileFS 系列其他文章的传送门
《 一步步教你使用 MogileFS 》
《 生产环境中如何使用 Nginx 反代 MogileFS 》 您当前所在位置
使用 Nginx 反代 MogileFS
在 MogileFS 前加反代的原因
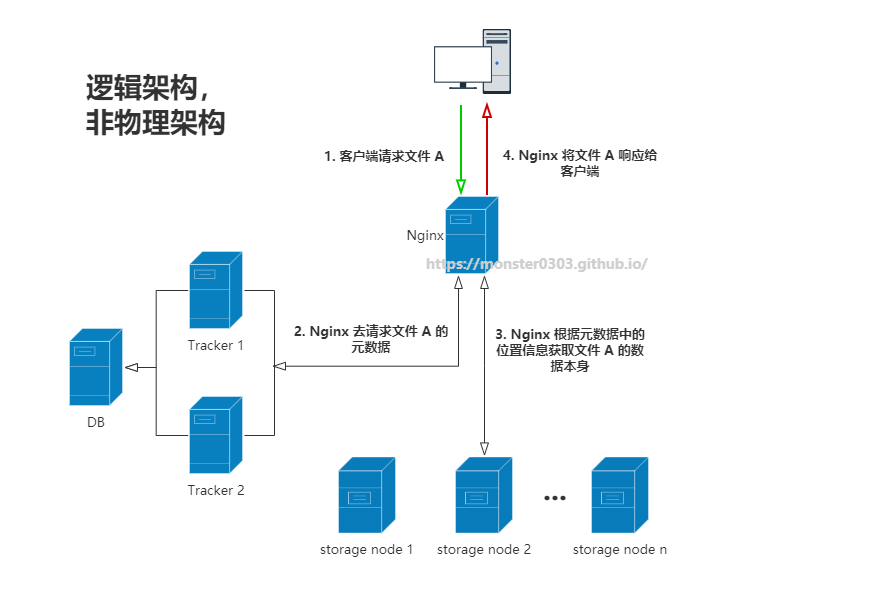
客户端加载数据的流程是:先从 Tracker 节点获取数据存储位置的参考答案,再去 Storage 节点读取真正的数据,而普通的客户端是不支持这样的操作的,所以需要在前端加一个反代来替客户端获取数据并返回给客户端。
Tracker 目前是单点,如果宕机会导致集群不可用,因为 Tracker 节点的数据流是无状态的,可以直接再添加一个 Tracker 节点,并在前端使用反代做负载均衡,保证集群高可用
可以实现以上功能的客户端
Perlbal: 开发 MogileFS 的公司自家研发的支持 MogileFS 协议的程序;
Nginx: Nginx 支持负载均衡,并可以做健康状态检测,而且性能好,是反代最好的选择;虽然自身不支持 MogileFS 协议,但是可以通过安装插件实现。
实验环境逻辑架构图
主机信息
IP
主机名
用途
192.168.50.11
node1
Tracker 1 node 、Storage node、Nginx
192.168.50.12
node2
Tracker 2 node 、Storage node
192.168.50.13
node3
Storage node、MariaDB
一、编译安装 Nginx
因为 Nginx 没有自带支持 MogileFS 的插件,所以需要编译安装 Nginx 来启用插件。
1、做编译安装前的准备
安装编译环境,解决依赖关系。
1
2
# yum groupinstall "Development Tools" "Server Platform Deveopment" # yum install openssl-devel pcre-devel
在官网下载 Nginx 的源码包。https://nginx.org/en/download.html
下载第三方模块 Mogilefs 的源码包,版本任选,如果编译时有问题再换另一个。
添加 nginx 用户,用来运行 nginx 服务进程:
1
2
# groupadd -r nginx # useradd -r -g nginx nginx
2、解压安装
解压源码,接着开始编译和安装 Nginx
1
2
3
4
5
6
7
8
9
10
11
12
13
14
15
16
17
18
19
20
21
22
23
24
25
[root@node1 ~]# tar -zxvf nginx-1.16.1.tar.gz nginx_mogilefs_module-1.0.4.tar.gz [root@node1 ~]# cd nginx-1.16.1 [root@node1 nginx-1.16.1]# ./configure \ --prefix=/usr \ --sbin-path=/usr/sbin/nginx \ --conf-path=/etc/nginx/nginx.conf \ --error-log-path=/var/log/nginx/error.log \ --http-log-path=/var/log/nginx/access.log \ --pid-path=/var/run/nginx/nginx.pid \ --lock-path=/var/lock/nginx.lock \ --user=nginx \ --group=nginx \ --with-http_ssl_module \ --with-http_flv_module \ --with-http_stub_status_module \ --with-http_gzip_static_module \ --http-client-body-temp-path=/var/tmp/nginx/client/ \ --http-proxy-temp-path=/var/tmp/nginx/proxy/ \ --http-fastcgi-temp-path=/var/tmp/nginx/fcgi/ \ --http-uwsgi-temp-path=/var/tmp/nginx/uwsgi \ --http-scgi-temp-path=/var/tmp/nginx/scgi \ --with-pcre \ --with-debug \ --add-module=/root/nginx_mogilefs_module-1.0.4/ # 要指定 Mogilefs 模块的源码路径 [root@node1 ~]# make && make install
如果 make 时遇到错误,可使用如下命令编译:
1 make CFLAGS="-pipe -O -W -Wall -Wpointer-arith -Wno-unused-parameter -g"
3、为 Nginx 提供 SysV init 脚本
新建文件 vim /etc/rc.d/init.d/nginx,内容如下:
1
2
3
4
5
6
7
8
9
10
11
12
13
14
15
16
17
18
19
20
21
22
23
24
25
26
27
28
29
30
31
32
33
34
35
36
37
38
39
40
41
42
43
44
45
46
47
48
49
50
51
52
53
54
55
56
57
58
59
60
61
62
63
64
65
66
67
68
69
70
71
72
73
74
75
76
77
78
79
80
81
82
83
84
85
86
87
88
89
90
91
92
93
94
95
96
97
98
99
100
101
102
103
104
105
106
107
108
109
110
111
112
113
114
115
116
117
118
119
120
121
122
123
124
125
126
# !/bin/sh # # # description: Nginx is an HTTP(S) server, HTTP(S) reverse \ # processname: nginx # config: /etc/nginx/nginx.conf # config: /etc/sysconfig/nginx # pidfile: /var/run/nginx.pid # Source function library. . /etc/rc.d/init.d/functions # Source networking configuration. . /etc/sysconfig/network # Check that networking is up. [ "$NETWORKING" = "no" ] && exit 0 nginx="/usr/sbin/nginx" prog=$(basename $nginx) NGINX_CONF_FILE="/etc/nginx/nginx.conf" [ -f /etc/sysconfig/nginx ] && . /etc/sysconfig/nginx lockfile=/var/lock/subsys/nginx make_dirs() { # make required directories user=`nginx -V 2>&1 | grep "configure arguments:" | sed 's/[^*]*--user=\([^ ]*\).*/\1/g' -` options=`$nginx -V 2>&1 | grep 'configure arguments:'` for opt in $options; do if [ `echo $opt | grep '.*-temp-path'` ]; then value=`echo $opt | cut -d "=" -f 2` if [ ! -d "$value" ]; then # echo "creating" $value mkdir -p $value && chown -R $user $value fi fi done } start() { [ -x $nginx ] || exit 5 [ -f $NGINX_CONF_FILE ] || exit 6 make_dirs echo -n $"Starting $prog: " daemon $nginx -c $NGINX_CONF_FILE retval=$? echo [ $retval -eq 0 ] && touch $lockfile return $retval } stop() { echo -n $"Stopping $prog: " killproc $prog -QUIT retval=$? echo [ $retval -eq 0 ] && rm -f $lockfile return $retval } restart() { configtest || return $? stop sleep 1 start } reload() { configtest || return $? echo -n $"Reloading $prog: " killproc $nginx -HUP RETVAL=$? echo } force_reload() { restart } configtest() { $ nginx -t -c $NGINX_CONF_FILE } rh_status() { status $prog } rh_status_q() { rh_status >/dev/null 2>&1 } case "$1" in start) rh_status_q && exit 0 $1 ;; stop) rh_status_q || exit 0 $1 ;; restart|configtest) $1 ;; reload) rh_status_q || exit 7 $1 ;; force-reload) force_reload ;; status) rh_status ;; condrestart|try-restart) rh_status_q || exit 0 ;; *) echo $"Usage: $0 {start|stop|status|restart|condrestart|try-restart|reload|force-reload|configtest}" exit 2 esac
为此脚本赋予执行权限:
1 # chmod +x /etc/rc.d/init.d/nginx
4、添加至服务管理列表,并让其开机自动启动
1
2
# chkconfig --add nginx # chkconfig nginx on
然后就可以启动服务并测试了
二、在 Nginx 中的配置
模块官方配置指令的说明和示例
单 tracker 示例
新建一个配置文件 vim /etc/nginx/conf.d/mogilefs.conf
1
2
3
4
5
6
7
8
9
10
location /imgs/ { mogilefs_tracker 192.168 .50 .11 :7001 ; mogilefs_domain imgs; mogilefs_class png jpg; mogilefs_pass { proxy_pass $mogilefs_path; proxy_hide_header Content-Type; proxy_buffering off; } }
双 tracker 示例
在有多个 tacker 时,可以使用 nginx 进行负载均衡,以实现高可用。
1
2
3
4
5
6
7
8
9
10
11
12
13
14
15
16
17
18
19
20
21
22
http { ... upstream mogtrackers { server 192.168 .50 .11 :7001 ; server 192.168 .50 .12 :7001 ; } ... server { ... location /imgs/ { mogilefs_tracker mogtrackers; mogilefs_domain imgs; mogilefs_class png jpg; mogilefs_pass { proxy_pass $mogilefs_path; proxy_hide_header Content-Type; proxy_buffering off; } ... } } }
测试
上传一个文件:
1 mogupload --trackers=192.168.50.11 --domain files --key='fstab.html' --file='/etc/fstab'
然后就可以从浏览器访问文件了,路径使用之前上传文件时指定的 key。
1
2
3
4
5
6
7
8
9
10
11
12
13
-> # # Created by anaconda on Thu May 30 05:21:36 2019 # # See man pages fstab(5), findfs(8), mount(8) and/or blkid(8) for more info # /dev/mapper/centos-root / xfs defaults 0 0 UUID=780667a3-0b8c-4c2c-94d2-77bad2e05c76 /boot xfs defaults 0 0 /dev/mapper/centos-swap swap swap defaults 0 0
参考:http://www.xionghaier.cn/archives/1018.html#31MogileFS