关于 Python 系列其他文章的传送门
《 Python 基础语法 》
《 Python 进阶:网络、多线程、异步、数据库、WEB 》
《 Python 和 RabbitMQ 的那点事 》
《 Python 和 Redis 的那点事 》
《 Python 爬虫基础和包 XPath、BeautifulSoup4、PhantomJS、Selenium 》 您当前所在位置
《 边爬豆瓣,边学习 Python 爬虫框架 Scrapy 》
《 用了 Scrapy-Redis 分布式爬虫后,一个能打的都没有! 》
《 全栈开发入门 JavaScript、React 和 Django 》
《 Django REST framework 的那点事 》
【 数据爬取 】
1. Robots 协议
指定一个 robots.txt 文件,告诉爬虫引擎什么可以爬取。http://www.taobao.com/robots.txt
2. HTTP 请求和响应处理
其实爬取网页就是通过 HTTP 协议访问网页,不过通过浏览器访问往往是人的行为,把这种行为变成使用程序来访问。
urllib 包
Python2 中提供了 urllib 和 urllib2。
urllib 是标准库,它一个工具包模块,包含下面的模块来处理 url:
urllib.request 用于打开和读写 url;urllib.error 包含了由 urllib.request 引起的异常;urllib.parse 用于解析 url;urllib.robotparser 分析 robots.txt 文件;
urllib.request 模块
模块定义了在基本和摘要式身份验证、重定向、cookies 等应用中打开 URL (主要是 HTTP) 的函数和类。
urlopen 方法
url 是链接地址字符串,或请求对象;data 提交的数据,如果 data 为 None 则发起 GET 请求,否则发起 POST 请求。源码部分见 urllib.request.Request#get_method;http.client.HTTPResponse 类的响应对象,这是一个类文件对象。
1
2
3
4
5
6
7
8
9
10
11
12
13
14
15
from urllib.request import urlopenresponse = urlopen('http://www.bing.com' ) print (response.closed)with response: print (1 , type (response)) print (2 , response.status, response.reason) print (3 , response.geturl()) print (4 , response.info()) print (response.closed)
上例,通过 urllib.request.urlopen 方法,发起一个 HTTP 的 GET 请求,WEB 服务器返回了网页内容。响应的数据被封装到类文件对象中,可以通过 read 方法、readline 方法、readlines 方法获取数据,status 和 reason 属性表示返回的状态码,info 方法返回头信息,等等。
User-Agent 问题
上例的代码非常精简,即可以获得网站的响应数据。urlopen 方法只能传递 url 和 data 这样的数据,不能构造 HTTP 的请求。例如 useragent。
源码中构造的 useragent 如下
1 2 3 4 5 6 class OpenerDirector : def __init__ (self ): client_version = "Python-urllib/%s" % __version__ self .addheaders = [('User-agent' , client_version)]
在别人看来,当前显示的 useragent 为:Python-urllib/3.6。
有些网站是反爬虫的,所以要把爬虫伪装成浏览器。随便打开一个浏览器,复制浏览器的 useragent 值,用来伪装。
下面就通过 Request 类来自定义 useragent。
Request 类
上面的问题可以使用这个来解决。
Request(url, data=None, headers={}):初始化方法,构造一个请求对象。可添加一个 header 的字典。data 参数决定是 GET 还是 POST 请求。add_header(key, val):为 header 中增加一个键值对。
1
2
3
4
5
6
7
8
9
10
11
12
13
14
15
16
17
18
19
20
21
22
23
24
25
26
27
28
29
30
31
32
33
34
from urllib.request import Request, urlopenimport randomurl = 'http://www.bing.com/' ua_list = [ "Mozilla/5.0 (Windows NT 6.1; Win64; x64) AppleWebKit/537.36 (KHTML, like Gecko) Chrome/57.0.2987.133 Safari/537.36" , "Mozilla/5.0 (Windows; U; Windows NT 6.1; zh-CN) AppleWebKit/537.36 (KHTML, like Gecko) Version/5.0.1 Safari/537.36" , "Mozilla/5.0 (Windows NT 6.1; Win64; x64; rv:50.0) Gecko/20100101 Firefox/50.0" , "Mozilla/5.0 (compatible; MSIE 9.0; Windows NT 6.1; Trident/5.0)" ] request = Request(url) request.add_header('User-Agent' , random.choice(ua_list)) print (type (request))response = urlopen(request, timeout=20 ) print (type (response))with response: print (1 , response.status, response.getcode(), response.reason) print (2 , response.geturl()) print (3 , response.info()) print (5 , request.get_header('User-agent' ))print (6 , 'user-agent' .capitalize())
urllib.parse 模块
该模块可以完成对 url 的编解码。
1
2
3
4
5
6
7
8
9
10
11
12
from urllib import parseu = parse.urlencode({ 'url' : 'http://www.baidu.com/python' , 'p_url' : 'http://www.baidu.com/python?id=1&name=张三' , }) print (u)url=http%3A%2F%2Fwww.baidu.com%2Fpython&p_url=http%3A%2F%2Fwww.baidu.com%2Fpython%3Fid%3D1%26name%3D%E5%BC%A0%E4%B8%89
从运行结果来看冒号、斜杠、&、等号、问号等符号全部被编码了,% 之后实际上是单字节十六进制表示的值。
一般来说 url 中的地址部分,一般不需要使用中文路径,但是参数部分,不管 GET 还是 POST 方法,提交的数据中,可能有斜杆、等号、问号等符号,这样这些字符表示数据,不表示元字符。
如果直接发给服务器端,就会导致接收方无法判断谁是元字符,谁是数据了。为了安全,一般会将数据部分的字符做 url 编码,这样就不会有歧义了。
后来可以传送中文,同样会做编码,一般先按照字符集的 encoding 要求转换成字节序列,每一个字节对应的十六进制字符串前加上百分号即可。
1 2 3 4 5 6 7 8 9 10 11 12 13 14 15 16 from urllib import parseprint ('中' .encode('utf-8' )) u = parse.urlencode({'wd' : '中' }) url = f"https://www.baidu.com/s?{u} " print (url)print ('---------------------------' )print (parse.unquote(u)) print (parse.unquote(url))
提交方法 method
最常用的 HTTP 交互数据的方法是 GET、POST。
GET 方法,数据是通过 URL 传递的,也就是说数据是在 HTTP 报文的 header 部分。
POST 方法,数据是放在 HTTP 报文的 body 部分提交的。
数据都是键值对形式,多个参数之间使用 & 符号连接。例如 a=1&b=abc。
GET
需求:请写程序,对指定关键字在 bing 完成搜索,将返回的结果保存到一个网页文件中。
连接必应搜索引擎官网,获取一个搜索的 URL,格式为:http://cn.bing.com/search?q=关键字。
1
2
3
4
5
6
7
8
9
10
11
12
13
14
15
16
17
18
19
20
21
22
23
from urllib.request import Request, urlopenfrom urllib.parse import urlencodekeyword = input ('>> 请输入搜索关键字 ' ) data = urlencode({ 'q' : keyword }) base_url = 'http://cn.bing.com/search' url = f'{base_url} ?{data} ' print (url)ua = "Mozilla/5.0 (Windows NT 6.1) AppleWebKit/537.36 (KHTML, like Gecko) Chrome/55.0.2883.75 Safari/537.36" request = Request(url, headers={'User-agent' : ua}) response = urlopen(request) with response: with open ('/tmp/bing.html' , 'wb' ) as f: f.write(response.read()) print ('成功' )
POST 方法
测试网站。一个可以接收 HTTP 请求并返回响应的网站。http://httpbin.org/
也可以在本地使用 docker 运行,方式:
1 docker run -p 80 :80 kennethreitz/httpbin
1
2
3
4
5
6
7
8
9
10
11
12
13
14
15
16
17
18
19
20
21
22
23
from urllib.request import Request, urlopenfrom urllib.parse import urlencodeimport simplejson"""定义头部""" request = Request('http://httpbin.org/post' ) request.add_header( 'User-agent' , "Mozilla/5.0 (Windows NT 6.1) AppleWebKit/537.36 (KHTML, like Gecko) Chrome/55.0.2883.75 Safari/537.36" ) """定义数据""" data = urlencode({'name' : '张三,@=/&*' , 'age' : '6' }) print (data)with urlopen(request, data=data.encode()) as res: res = res.read() res_str: str = res.decode() print (res_str) res_dict: dict = simplejson.loads(res_str) print (res_dict)
处理 JSON 数据
查看“豆瓣电影”,看到“最近热门电影”的“热门”https://movie.douban.com/
通过分析, 我们知道这部分内容, 是通过 AJAX 从后台拿到的 json 数据。
在浏览器中的 XHR 中可以查看异步发出的请求。
访问“热门电影”的 URL 是:
1 2 3 4 5 6 7 8 9 https://movie.douban.com/j/search_subjects?type =movie&tag=热门&page_limit=50 &page_start=0 - tag 标签是“热门”,表示热门电影 - type 数据类型 - movie 是电影 - page_limit 表示返回数据的总数 - page_start 表示数据偏移
获取“热门电影” JSON 数据的代码实现:
1
2
3
4
5
6
7
8
9
10
11
12
13
14
15
16
17
18
19
20
21
22
23
24
25
26
from urllib.request import Request, urlopenfrom urllib.parse import urlencodeimport simplejsonstart_url = 'https://movie.douban.com/j/search_subjects' query = urlencode({ 'type' : 'movie' , 'tag' : '热门' , 'page_limit' : 2 , 'page_start' : 0 }) url = f'{start_url} ?{query} ' request = Request(url) request.add_header( 'User-agent' , "Mozilla/5.0 (Windows NT 6.1) AppleWebKit/537.36 (KHTML, like Gecko) Chrome/55.0.2883.75 Safari/537.36" ) with urlopen(request) as res: res = res.read() res_dict: dict = simplejson.loads(res) print (res_dict)
HTTPS 证书忽略 – ssl 模块
通过 HTTPS 访问网站时,如果遇到证书不可信时,能否像浏览器一样,忽略证书的不安全提示信息呢?
1
2
3
4
5
6
7
8
9
10
11
12
13
14
15
16
17
from urllib.request import Request, urlopenimport ssl request = Request('https://192.168.50.1:8443/Main_Login.asp' ) request.add_header( 'User-agent' , "Mozilla/5.0 (Windows NT 6.1) AppleWebKit/537.36 (KHTML, like Gecko) Chrome/55.0.2883.75 Safari/537.36" ) context = ssl._create_unverified_context() res = urlopen(request, context=context) with res: print (1 , res._method) print (2 , res.geturl())
urllib3 库 – 多了连接池管理
https://urllib3.readthedocs.io/en/latest/
标准库 urllib 缺少了一些关键的功能,非标准库的第三方库 urllib3 提供了,比如说连接池管理。
实际使用时推荐使用之后介绍的的 requests 库,他包装了 urllib3,使用的 API 更加友好。
安装
使用示例:
1
2
3
4
5
6
7
8
9
10
11
12
13
14
import urllib3url = 'https://movie.douban.com/' ua = "Mozilla/5.0 (Windows NT 6.1) AppleWebKit/537.36 (KHTML, like Gecko) Chrome/55.0.2883.75 Safari/537.36" with urllib3.PoolManager() as http: response = http.request('GET' , url, headers={ 'User-Agent' :ua }) print (type (response)) print (response.status, response.reason) print (response.headers)
requests 库 ***
requests 使用了 urllib3,但是 API 更加友好,推荐使用。
requests 默认使用 Session 对象,是为了在多次和服务器端交互中保留会话的信息,例如 cookie。
1 2 3 4 5 6 7 8 9 10 11 12 13 14 15 16 17 18 19 20 21 22 23 import requestsua = "Mozilla/5.0 (Windows NT 6.1) AppleWebKit/537.36 (KHTML, like Gecko) Chrome/55.0.2883.75 Safari/537.36" urls = ['https://www.baidu.com/s?wd=apple' , 'https://www.baidu.com/s?wd=apple' ] session = requests.Session() with session: for url in urls: response = session.get(url, headers={'User-Agent' : ua}) with response: print (response.request.headers) with open ('/tmp/movie.html' , 'w' , encoding='utf-8' ) as f: f.write(response.text)
【 数据分析 】
1. HTML 数据解析
通过上面的库,都可以拿到 HTML 内容。
HTML 的内容返回给浏览器,浏览器就会解析它,并对它渲染。
HTML 超文本表示语言,设计的初衷就是为了超越普通文本,让文本表现力更强。 XML 扩展标记语言,不是为了代替 HTML,而是觉得 HTML 的设计中包含了过多的格式,承担了一部分数据之外的任务,所以才设计了 XML 只用来描述数据。
HTML 和 XML 都有结构,使用标记形成树型的嵌套结构。DOM(Document Object Model)来解析这种嵌套树型结构,浏览器往往都提供了对 DOM 操作的 API,可以用面向对象的方式来操作 DOM。
注意 :
下文中介绍了多种方式来提取出 html 中的内容,但其实不管是使用 XPath,还是 BS4 中的 find_all、css 等,都是一种手段,看哪种适合自己就用哪一种。lxml 解释器是基于 C 的,性能上应该是最好的,但其实如果没有那么多数据需要爬取,也不是非它不可,有时候抓取的太快,反而可能被目标网站发现而被屏蔽,这时候如果用性能慢一点的手段也是可以的。
2. XPath 技术 *
http://www.w3school.com.cn/xpath/index.asp 中文教程。
XPath 是一门在 XML 文档中查找信息的语言。XPath 可用来在 XML 文档中对元素和属性进行遍历。
工具:
win7+: XMLQuire,需要 .NET 框架 4.0-4.5。
mac:
Oxyden(Crack 版)推荐;
XPath(需要 6 元购买,还没试过);
等等。。。
测试 XPath 需要用到的 XML 文件 books.xml:
1
2
3
4
5
6
7
8
9
10
11
12
13
14
15
16
17
18
19
20
21
22
23
24
25
26
27
28
29
30
31
32
33
34
35
36
37
38
39
40
41
42
43
<?xml version="1.0" encoding="utf-8" ?> <bookstore > <book id ="bk101" > <author > Gambardella, Matthew</author > <title > XML Developer's Guide</title > <genre > Computer</genre > <price > 44.95</price > <publish_date > 2000-10-01</publish_date > <description > An in-depth look at creating applications with XML.</description > </book > <book id ="bk102" > <author > Ralls, Kim</author > <title > Midnight Rain</title > <genre > Fantasy</genre > <price > 5.95</price > <publish_date > 2000-12-16</publish_date > <description > A former architect battles corporate zombies, an evil sorceress, and her own childhood to become queen of the world.</description > </book > <book id ="bk103" > <author > Corets, Eva</author > <title > Maeve Ascendant</title > <genre > Fantasy</genre > <price > 5.95</price > <publish_date > 2000-11-17</publish_date > <description > After the collapse of a nanotechnology society in England, the young survivors lay the foundation for a new society.</description > </book > <book id ="bk104" > <author > Corets, Eva</author > <title > Oberon's Legacy</title > <genre > Fantasy</genre > <price > 5.95</price > <publish_date > 2001-03-10</publish_date > <description > In post-apocalypse England, the mysterious agent known only as Oberon helps to create a new life for the inhabitants of London. Sequel to Maeve Ascendant.</description > </book > </bookstore >
XPath 的概念
在 XPath 中,有七种类型的节点
元素 Corets, Eva;
属性 id="bk104",id 是元素节点 book 的属性 ;
文本;
命名空间;
处理指令;
注释;
文档(根)节点 /。
关系
节点之间的嵌套形成父子(parent、children)关系。
具有同一个父节点的不同节点是兄弟(sibling)关系。
谓语(Predicates)
谓语用来查找某个特定的节点或者包含某个指定的值的节点。
谓语是用 [] 括起来的。
谓语就是查询的条件,可以想象为类似 SQL 中的 WHERE。
操作符或表达式
含义
/
从根节点开始找
//
从当前节点开始的任意
.
当前节点
…
当前节点的父节点
@
选择属性
节点名
选取所有这个节点
*
匹配任意元素节点
@*
匹配任意属性节点
node()
匹配任意类型的节
text()
匹配text类型节点
XPath 轴(Axes)
轴名称
结果
ancestor选取当前节点的所有先辈(父、祖父等)
ancestor-or-self选取当前节点的所有先辈(父、祖父等)以及当前节点本身
attribute选取当前节点的所有属性。@id 等价于 attribute::id
child选取当前节点的所有子元素。title 等价于 child:title
descendant选取当前节点的所有后代元素(子、孙等)
descendant-or-self选取当前节点的所有后代元素(子、孙等)以及当前节点本身
following选取文档中当前节点的结束标签之后的所有节点
namespace选取当前节点的所有命名空间节点
parent选取当前节点的父节点
preceding直到所有这个节点的父辈节点,顺序选择每个父辈节点前的所有同级节点
preceding-sibling选取当前节点之前的所有同级节点
self选取当前节点。等价于 self::node()
XPath 实例
以斜杠开始的称为绝对路径,表示从根开始。 不以斜杆开始的称为相对路径,一般都是依照当前节点来计算。当前节点在上下文环境中,很可能已经不是根节点了。 一般为了方便,往往 xml 如果层次很深,都会使用 // 来查找节点。
XPath 的使用示例
基本涵盖了常用的使用方式,实际使用时,往往都是下列的组合形式:
路径表达式
含义
title选取当前节点下所有 title 子节点
/book从根结点找子节点是 book 的,会找不到
book/title当前节点下所有子节点 book 下的 title 节点
//title从根节点向下找任意层中 title 的节点
book//title当前节点下所有 book 子节点下任意层次的 title 节点
//@name任意层下含有 name 的属性,取回的是属性
//book[@id]任意层下含有 name 属性的 book 节点
//book[@id="bk101"]任意层下含有 name 属性且等于 bk101 的 book 节点
/bookstore/book[1]根节点 bookstore 下第一个 book 节点,从 1 开始
/bookstore/book[1]/@id根节点 bookstore 下第一个 book 节点的 id 属性
/bookstore/book[last()-1]根节点 bookstore 下倒数第二个 book 节点,函数 last()
/bookstore/*匹配根节点 bookstore 的所有子节点,不递归
//*匹配所有子孙节点
//*[@*]匹配所有有属性的节点
//book[@*]匹配所有有属性的 book 节点
//@*匹配所有属性
//book/title//price匹配 book 下的 title 节点或者任意层下的 price
//book[position()=2]匹配 book 节点,取第二个
//book[position()<last()-1]匹配 book 节点,取位置小于倒数第二个
//book[price>40]匹配 price 节点值大于 40 的 book 节点
//book[2]/node()匹配位置为 2 的 book 节点下的所有类型的节点
//book[1]/text()匹配第一个 book 节点下的所有文本子节点
//book[1]//text()匹配第一个 book 节点下的所有文本节点
//*[local-name()='book']匹配所有节点且不带限定名的节点名称为 book 的所有节点
//book/child::node()[localname()='price' and text()<10]所有 book 节点的子节点中名字叫做 price 的且其内容小于 10 的节 点,等价于 //book/price[text()<10]
使用 lxml 库的基本使用
lxml 是 Python 下功能丰富的 XML、HTML 解析库,性能非常好,是对 libxml2 和 libxslt 的封装。
官网说明:https://lxml.de/installation.html
lxml安装
如何用 lxml.etree 构建 HTML:
1
2
3
4
5
6
7
8
9
10
11
12
13
14
15
16
17
18
19
20
21
22
23
24
25
26
27
28
from lxml import etreeroot = etree.Element('html' ) print (root.tag) body = etree.Element('body' ) root.append(body) print (etree.tostring(root))sub = etree.SubElement(body, 'child1' ) sub = etree.SubElement(body, 'child2' ).append(etree.Element('child2-1' )) print (etree.tostring(root, pretty_print=True ).decode()) <html> <body> <child1/> <child2> <child2-1 /> </child2> </body> </html>
通过 XPath 来获取豆瓣十大热门电影
etree 还提供了 2 个有用的函数
etree.HTML(text):解析 HTML 文档,返回根节点;anode.xpath('xpath路径'):对节点使用 xpath 语法。
从豆瓣电影中提取“本周口碑榜”:
1
2
3
4
5
6
7
8
9
10
11
12
13
14
15
from lxml import etreeimport requestsurl = 'https://movie.douban.com/' ua = "Mozilla/5.0 (Windows NT 6.1) AppleWebKit/537.36 (KHTML, like Gecko) Chrome/55.0.2883.75 Safari/537.36" with requests.get(url, headers={'User-agent' : ua}) as response: content = response.text html = etree.HTML(content) titles = html.xpath("//div[@class='billboard-bd']//tr" ) for title in titles: txt = title.xpath('.//text()' ) a = '' .join(map (lambda x: x.strip(), txt)) print (a) print ('================' )
3. BeautifulSoup4 *
BeautifulSoup 可以从 HTML、XML 中提取数据。目前 BS4 在持续开发。
官方中文文档:https://www.crummy.com/software/BeautifulSoup/bs4/doc.zh/
安装、导入
1
2
3
pip install beautifulsoup4 from bs4 import BeautifulSoup≤≤
初始化
BeautifulSoup(markup="", features=None):
markup 可以是文件对象或者 html 字符串;features 指定解析器,返回一个文档对象。
也可以不指定解析器,就依赖系统已经安装的解析器库了。比如:
1
2
3
4
5
6
from bs4 import BeautifulSoupsoup = BeautifulSoup(open ("index.html" )) soup = BeautifulSoup("<html>data</html>" )
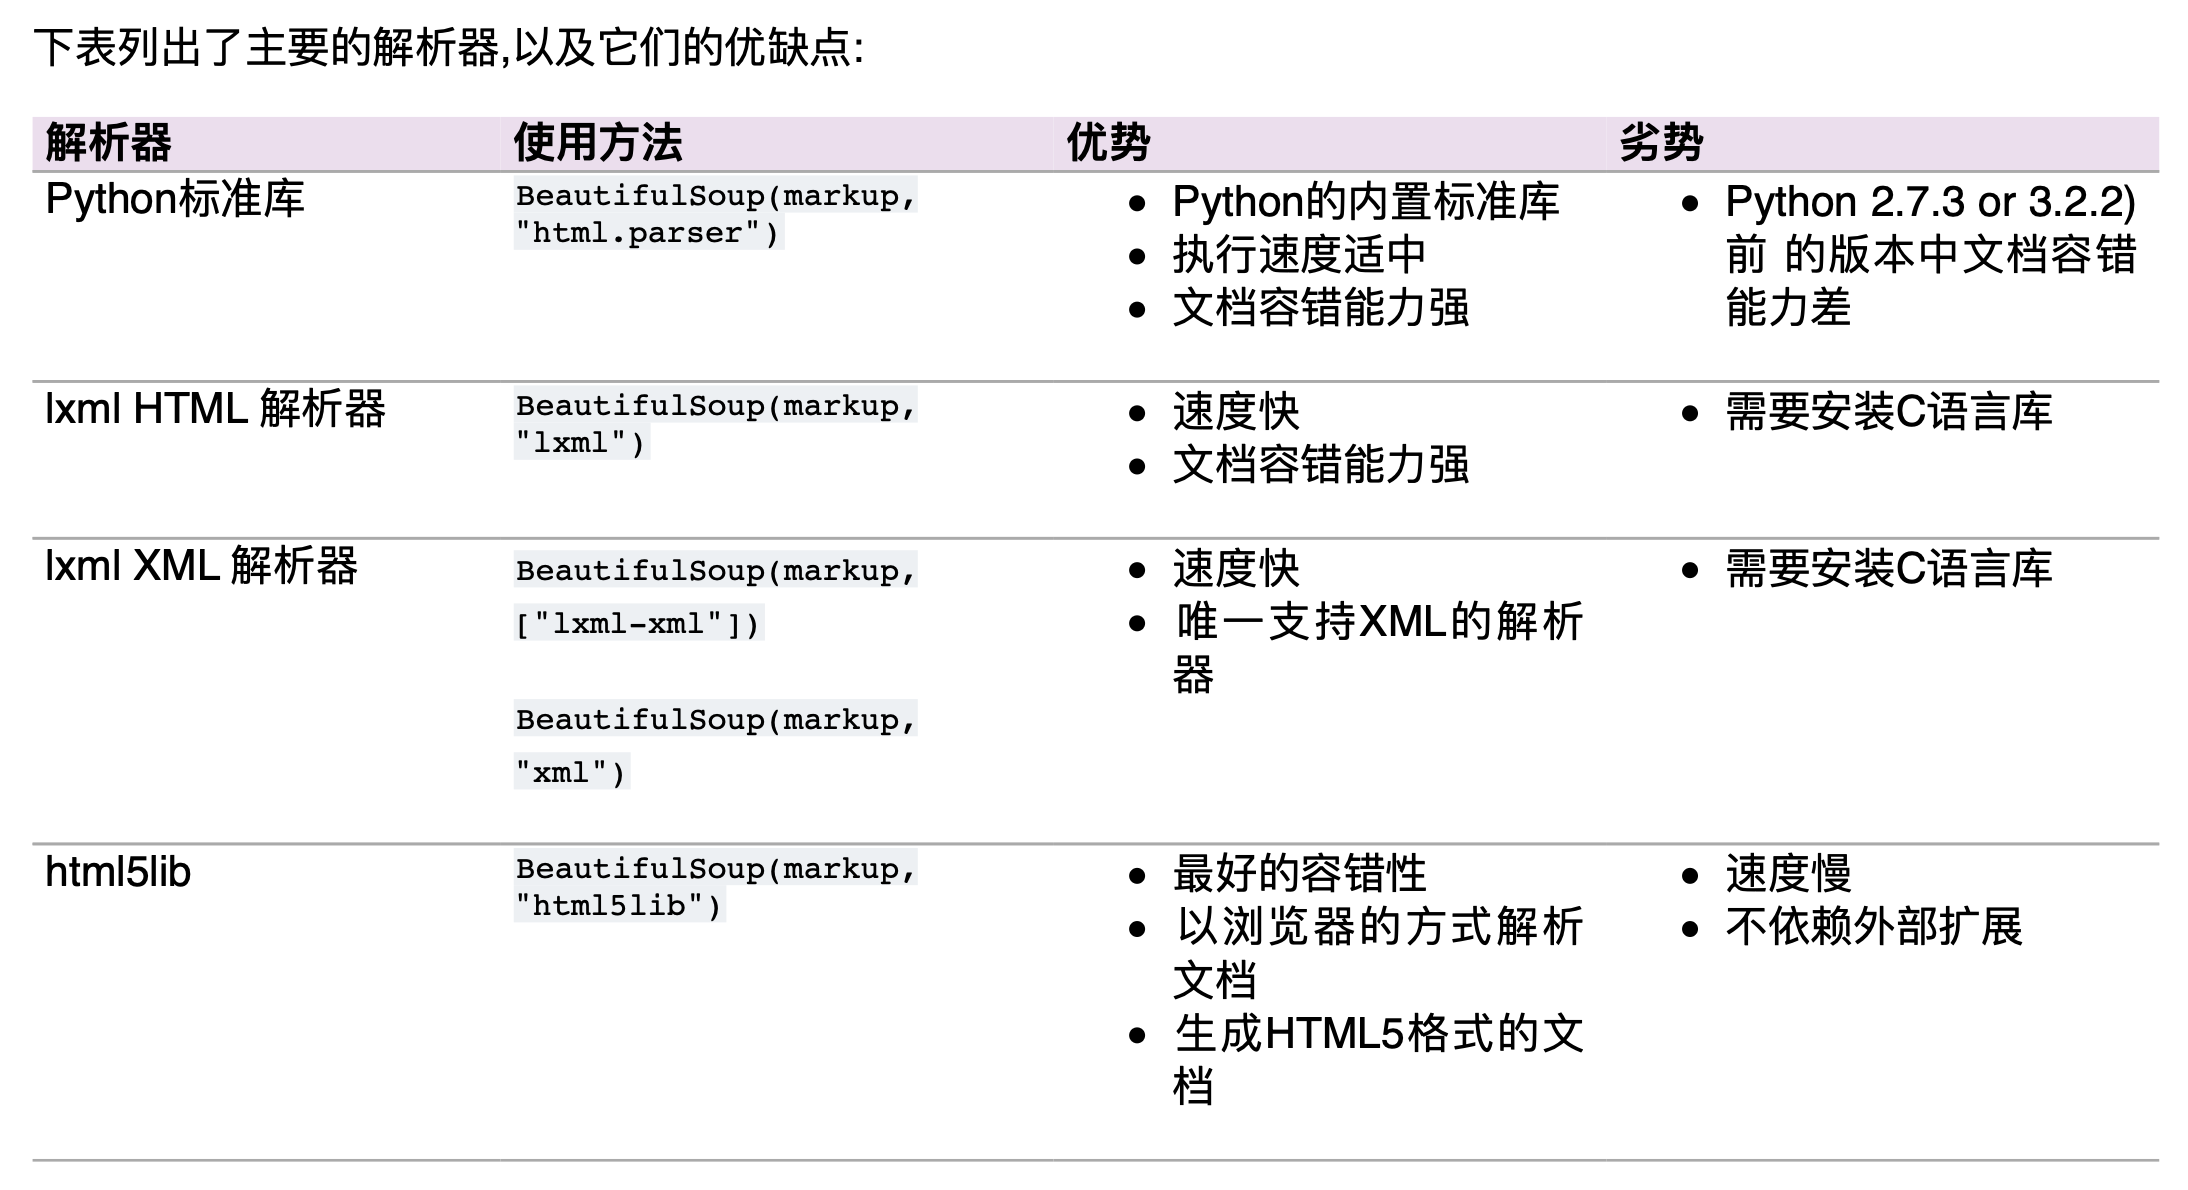
关于解释器 features:
BeautifulSoup(markup, "html.parser"):使用 Python 标准库,容错差且性能一般。BeautifulSoup(markup, "lxml"):容错能力强,速度快。需要安装系统 C 库。
推荐使用 lxml 作为解析器,效率高,再一个手动指定解析器,以保证代码在所有运行环境中解析器一致。
四种对象
BeautifulSoup 将 HTML 文档解析成复杂的树型结构,每个节点都是 Python 的对象,可分为 4 种:
BeautifulSoup、Tag、NavigableString、Comment
BeautifulSoup 对象:
Tag 对象:
它对应着 HTML 中的标签。
有 2 个常用的属性:
name:Tag 对象的名称,就是标签名称;attrs:标签的属性字典。
多值属性:对于 class 属性可能是下面的形式,这个属性就是多值。可以被修改、删除。<h3 class="title highlight">python高级班</h3>
NavigableString 对象:
如果只想输出标记内的文本,而不关心标记的话,就要使用 NavigableString。
print(soup.div.p.string):第一个 div 下第一个 p 的字符串;print(soup.p.string):同上
Comment 注释对象:
标记 HTML 中的注释,用处很少。它被 BeautifulSoup 解析后对应 Comment 对象。
解析
尝试使用 bs4 解析下面这个文件 test.html:
1
2
3
4
5
6
7
8
9
10
11
12
13
14
15
16
17
18
19
20
21
22
23
24
25
文件:test.html <!DOCTYPE html > <html lang ="en" > <head > <meta charset ="UTF-8" > <title > 首页</title > </head > <body > <h1 > 欢迎您</h1 > <div id ="main" > <h3 class ="title highlight" > python 高级</h3 > <div class ="content" > <p id ='first' > 字典</p > <p id ='second' > 列表</p > <input type ="hidden" name ="_csrf" value ="7139e401481ef2f46ce98b22af4f4bed" > <img id ="bg1" src ="http://www.monster.com/" > <img id ="bg2" src ="http://httpbin.org/" > </div > </div > <p > bottom</p > </body > </html >
注意 ,我们一般不使用下面这种方式来操作 HTML,此代码是为了熟悉对象类型。
1 2 3 4 5 6 7 8 9 10 11 12 13 14 15 16 17 18 19 20 21 22 23 24 25 26 27 from bs4 import BeautifulSoupwith open ('test.html' , encoding='utf-8' ) as f: soup = BeautifulSoup(f, 'lxml' ) print (soup.builder) print ('-' * 30 ) print (2 , soup.div) print (3 , soup.div.name, soup.div.attrs) print (3.1 , soup.p, soup.p.attrs) print (3 , soup.div.get('class' )) print (4 , soup.h3['class' ]) print (4 , soup.h3.get('class' )) print (4 , soup.h3.attrs.get('class' )) print (5 , soup.img.get('src' )) soup.img['src' ] = 'http://www.python.org/' print (5 , soup.img['src' ]) print (6 , soup.a) del soup.h3['class' ] print (4 , soup.h3.get('class' ))
遍历文档树
在文档树中找到关心的内容才是日常的工作,也就是说如何遍历树中的节点。
使用上面的 test.html 文件来测试。
使用 Tagsoup.div:可以找到从根节点开始查找第一个 div 节点;soup.div.p:说明从根节点开始找到第一个 div,后返回一个 Tag 对象,这个 Tag 对象下继续找第一个 p,找到返回 Tag 对象;soup.p:说明遍历是深度优先,因为返回了文字“字典”,而不是文字 “bottom”。
遍历直接子节点print(soup.div.contents):将对象的所有类型直接子节点以列表方式输出;print(soup.div.children):返回子节点的迭代器;print(list(soup.div.children)):等价于 soup.div.contents。
遍历所有子孙节点print(list(soup.div.descendants)):返回第一个 div 节点的所有类型子孙节点,可以看出迭代次序是深度优先。
遍历字符串soup.div.string:返回 None,是因为 string 要求 soup.div 中只能有一个 NavigableString 类型子节点, 也就是像这样 <div>only string</div>
如果 div 有很多子孙节点,如何提取字符串呢?print(soup.div.string):这样会返回 None,这不是我们想要的;print("".join(soup.div.strings)):可以返回迭代器,带多余的空白字符;print("".join(soup.div.stripped_strings)):还可以去除多余的空白字符。
遍历祖先节点print(soup.parent):返回 None,因为根节点没有父节点;print(soup.div.parent.name):返回 body,第一个 div 的父节点;print(soup.p.parent.parent.get('id')):返回 main;print(list(map(lambda x: x.name, soup.p.parents))):父迭代器,由近及远。
遍历兄弟节点print('{} [{}]'.format(1, soup.p.next_sibling)) 第一个 p 元素的下一个兄弟节点,注意两个兄弟节点中间,可能是一个文本节点;print('{} [{}]'.format(2, soup.p.previous_sibling));print(list(soup.p.next_siblings)) previous_siblings。
遍历其他元素next_element 是下一个可被解析的对象(字符串或tag),和下一个兄弟节点 next_sibling 不一样;print(soup.p.next_element) 会返回"字典"2个字;print(soup.p.next_element.next_element.next_element);print(list(soup.p.next_elements))。
搜索文档树
find 系有很多方法,请自行查帮助。
1 find_all(name=None , attrs={}, recursive=True , text=None , limit=None , **kwargs)
注意:find_all 会立即返回一个列表。
name 参数别被名字忽悠了,其实官方称为 filter 过滤器 ,这个参数可以是以下类型:
字符串:print(soup.find_all('p')):返回文档中所有p标签。
正则表达式对象:import re print(soup.find_all(re.compile('^h\d'))):标签名以 h 开头后接数字。
列表:print(soup.find_all(['p', 'h1', 'h3'])):或,找出列表所有的标签。print(soup.find_all(re.compile(r'^(p|h\d)$'))):使用正则完成。
True 或 None:find_all 会返回全部非字符串节点、非注释节点,即返回所有 Tag 标签类型。print(list(map(lambda x:x.name, soup.find_all(True))))print(list(map(lambda x:x.name, soup.find_all(None))))print(list(map(lambda x:x.name, soup.find_all())))
1 2 3 4 5 6 7 8 9 10 11 12 13 14 15 16 17 18 19 20 21 22 23 24 25 26 from bs4 import BeautifulSoupfrom bs4.element import Tagwith open ( 'test.html' , encoding='utf-8' ) as f: soup = BeautifulSoup(f, 'lxml' ) values = [True , None , False ] for value in values: all = soup.find_all(value) print (len (all )) print ('-' * 30 ) count = 0 for i, t in enumerate (soup.descendants): print (i, type (t), t.name) if isinstance (t, Tag): count += 1 print (count)
函数:class 属性且有多个值的节点,而符合这个要求只有 h3 标签:
1
2
3
4
5
6
7
8
9
10
11
12
from bs4 import BeautifulSoupdef many_class (tag ): print (type (tag)) print (tag.attrs) return len (tag.attrs.get('class' , [])) > 1 with open ('o:/test.html' , encoding='utf-8' ) as f: soup = BeautifulSoup(f, 'lxml' ) print (soup.find_all(many_class))
keyword 传参使用关键字传参,如果参数名不是已定义的位置参数名,参数会被 kwargs 收集并被 当做标签的属性 来搜索。
print(soup.find_all(id='first')):id 为 first 的所有节 点列表;print(soup.find_all(id=re.compile('\w+'))):相当于找有 id 的所有节点;print(soup.find_all(id=True)):所有有 id 的节点;print(list(map(lambda x:x['id'], soup.find_all(id=True))))print(soup.find_all(id=['first', 'second'])):指定 id 的名称列表;print(soup.find_all(id=True, src=True)):相当于条件 and,既有 id 又有 src 属性的节点列表.
css 的 class 的特殊处理
class 是 Python 关键字,所以使用 class_,class 是多值属性,可以匹配其中任意一个,也可以完全匹配:
print(soup.find_all(class_="content"));print(soup.find_all(class_="title")):可以使用任意一个 css 类;print(soup.find_all(class_="highlight")):可以使用任意一个 css 类;print(soup.find_all(class_="highlight title")):顺序错了,会找不到;print(soup.find_all(class_="title highlight")):顺序一致,找到,就是字符串完全匹配;
attrs 参数attrs 接收一个字典,字典的 key 为属性名,value 可以是字符串、正则表达式对象、True、列表:
print(soup.find_all(attrs={'class':'title'}))print(soup.find_all(attrs={'class':'highlight'}))print(soup.find_all(attrs={'class':'title highlight'}))print(soup.find_all(attrs={'id':True}))print(soup.find_all(attrs={'id':re.compile(r'\d$')}))
text 参数可以通过 text 参数搜索文档中的字符串内容,接受字符串、正则表达式对象、True、列表;
print(list(map(lambda x: (type(x), x), soup.find_all(text=re.compile('\w+')))))print(list(map(lambda x: (type(x), x), soup.find_all(text=re.compile('[a-z]+')))))print(soup.find_all(re.compile(r'h|p'), text=re.compile('[a-z]+'))):相当于过滤出 Tag 对象,并看它的 string 是否符合 text 参数的要求。
limit 参数限制返回结果的数量:
print(soup.find_all(id=True, limit=3)) 返回列表中有 3 个结果。
recursive 参数默认是递归搜索所有子孙节点,如果不需要请设置为 False。
简化写法
find_all() 是非常常用的方法,可以简化省略掉:
soup.find_all("a")soup("a")(找所有的 a): 注意不等价于 soup.a(找 soup 里第一个 a)soup.a.find_all(text=True)soup.a(text=True)print(soup.find_all('img', attrs={'id':'bg1'}))print(soup('img', attrs={'id':'bg1'})):find_all 的省略print(soup('img', attrs={'id':'bg1'}))
find 方法find(name , attrs , recursive , text , **kwargs)
参数几乎和 find_all 一样。
区别:
找到了,find_all 返回一个列表,而 find 返回一个单值,元素对象;
找不到,find_all 返回一个空列表,而 find 返回一个 None。
print(soup.find('img', attrs={'id':'bg1'}).attrs.get('src', 'monster'))
print(soup.find('img', attrs={'id':'bg1'}).get('src')):简化了 attrs
print(soup.find('img', attrs={'id':'bg1'})['src'])
CSS 选择器 ***
和 JQuery 一样,可以使用 CSS 选择器来查找节点。
使用 soup.select() 方法,select 方法支持大部分 CSS 选择器,返回的是列表。
标签名 – 直接使用;
类名 – 前加 . 点号;
id 名 – 前加 # 井号。
1
2
3
4
5
6
7
8
9
10
11
12
13
14
15
16
17
18
19
20
21
22
23
24
25
26
27
28
29
30
31
32
33
34
35
36
37
38
39
40
41
from bs4 import BeautifulSoupwith open ('o:/test.html' , encoding='utf-8' ) as f: from bs4 import BeautifulSoup with open ('o:/test.html' , encoding='utf-8' ) as f: soup = BeautifulSoup(f, 'lxml' ) print (1 , soup.select('p' )) print (2 , soup.select('.title' )) print (3 , soup.select('div.content> p:nth-of-type(2)' )) print (4 , soup.select('p#second' )) print (5 , soup.select('#title' )) print (6 , soup.select('div p' )) print (7 , soup.select('div div p' )) print (8 , soup.select('div> p' )) print (9 , soup.select('div p:nth-of-type(1) + [src]' )) print (10 , soup.select('div p:nth-of-type(1) ~ [src]' )) print (11 , soup.select('[src]' )) print (12 , soup.select('[src="/"]' )) print (13 , soup.select('[src="http://www.monster.com/"]' )) print (14 , soup.select('[src^="http://www"]' )) print (15 , soup.select('[src$="com/"]' )) print (16 , soup.select('img[src*="monster"]' )) print (17 , soup.select('img[src*=".com"]' )) print (18 , soup.select('[class~=title]' ))
获取文本内容
搜索节点的目的往往是为了提取该节点的文本内容,一般不需要 HTML 标记,只需要文字。
1
2
3
4
5
6
7
8
9
10
11
12
13
14
15
16
17
18
19
20
21
22
23
24
25
26
27
28
29
from bs4 import BeautifulSoupdef p (): print ('-' * 20 ) with open ( 'test.html' , encoding='utf-8' ) as f: soup = BeautifulSoup(f, 'lxml' ) ele = soup.select('div' ) print (ele[0 ].string) p() print (list (ele[0 ].strings)) p() print (list (ele[0 ].stripped_strings)) p() print (ele[0 ]) p() print (ele[0 ].text) p() print (ele[0 ].get_text()) p() print (ele[0 ].get_text(strip=True )) p()
4. Json 解析
如果拿到的不是 html,而是一个 Json 字符串,如果想提取其中的部分内容,就需要遍历,在遍历过程中进行判断。
不过还有一种方式,类似于 XPath,叫做 JsonPath 。
注意:
为了网站的开发方便,其实大部分 Json 的结构不会很复杂,用普通的方式就可以处理,用这个库反而有点杀鸡用牛刀。
安装:
官网:http://goessner.net/articles/JsonPath/
语法:
XPath
JsonPath
说明
/$根元素
.@当前节点
/. or []获取子节点
..不支持
父节点
//..任意层次
**通配符,匹配任意节点
@不支持
Json 中没有属性
[][]下标操作
|[,]XPath 中是”或“操作,而 JSONPath 中允许将备用名称或数组索引作为一个集合
不支持
[start🔚step]切片
[]?()过滤操作
不支持
()表达式计算
()
不支持
分组
依然用豆瓣电影的热门电影的 Json:https://movie.douban.com/j/search_subjects?type=movie&tag=%E7%83%AD%E9%97%A8&page_limit=10&page_start=0
来找到得分高于 8 分的电影。
思路:
找到 title 非常容易,但是要用其兄弟节点 rate 判断是否大于 8 分,就不好做了。[ ] 查找子节点,
1 2 3 4 5 6 7 8 9 10 11 12 13 14 15 16 17 18 19 20 21 22 23 24 25 from jsonpath import jsonpathimport requestsimport jsonua = "Mozilla/5.0 (Windows NT 6.1) AppleWebKit/537.36 (KHTML, like Gecko) Chrome/55.0.2883.75 Safari/537.36" url = 'https://movie.douban.com/j/search_subjects?type=movie&tag=%E7%83%AD%E9%97%A8&page_limit=10&page_start=0' with requests.get(url, headers={'User-agent' : ua}) as response: text = response.text print (text) js = json.loads(text) print (js) rs1 = jsonpath(js, '$..title' ) print (rs1) rs2 = jsonpath(js, '$..subjects[?(@.rate >"8")]' ) print (rs2) rs3 = jsonpath(js, '$..subjects[?(@.rate >"8")].title' ) print (rs3)
【 演示示例 】
1. 模拟登陆 oschina(开源中国)
一般登录后,用户就可以一段时间内可以使用该用户身份操作,不需要频繁登录了。这背后往往使用了 Cookie 技术。
Cookie 网景公司发明。cookie 一般是一个键值对 name=value,但还可以包括 expire 过期时间、path 路径、domain 域、secure 安全等信息。
获取 oschina 的登录 cookies
打开控制台,清空 oschina.net 的所有 cookies。
使用 wei.xu@magedu.com magedu.com18 登录,并勾选 “记住密码”。
观察 HTTP 的请求头。对比登录前后的 cookie 值,会发现登录后有 oscid 信息,如下:
1
2
# 登陆后在 Cookie 信息中有 oscid 的信息 Cookie: Hm_lpvt_a411c4d1664dd70048ee98afe7b28f0b=1607838837; Hm_lvt_a411c4d1664dd70048ee98afe7b28f0b=1607838766; oscid=ZV2oveUqo28xv80qumQtfRqukWzpKq2brNqjn0Y0a5kFTeUQUUbcPj2dwLIiVt%2Fuku%2B1h51DD%2B%2BD%2FF%2Bee1WHcRlM54togP0EcI%2Fbfmz4M2DvwoknIq3L6arEKkqVYfw%2BdNYj1bbHQEhDiqhDeFBZbsf7ouMp1Msoa4cH6mU1ZtM%3D; yp_riddler_id=7ee41bb6-ccd7-4aa9-99ff-fe529b453bae; _reg_key_=hWiLcgfB9sxj0gE1cJBj; _user_behavior_=c137524a-ce4c-4a88-af04-eaa9b2594cac
完整的 HTTP 请求头 如下:
1 2 3 4 5 6 7 8 9 Cookie: Hm_lpvt_a411c4d1664dd70048ee98afe7b28f0b=1607838837 ; Hm_lvt_a411c4d1664dd70048ee98afe7b28f0b=1607838766 ; oscid=ZV2oveUqo28xv80qumQtfRqukWzpKq2brNqjn0Y0a5kFTeUQUUbcPj2dwLIiVt%2Fuku%2B1h51DD%2B%2BD%2FF%2Bee1WHcRlM54togP0EcI%2Fbfmz4M2DvwoknIq3L6arEKkqVYfw%2BdNYj1bbHQEhDiqhDeFBZbsf7ouMp1Msoa4cH6mU1ZtM%3D; yp_riddler_id=7ee41bb6-ccd7-4aa9-99ff-fe529b453bae; _reg_key_=hWiLcgfB9sxj0gE1cJBj; _user_behavior_=c137524a-ce4c-4a88-af04-eaa9b2594cac Accept: text/html,application/xhtml+xml,application/xml;q=0.9 ,*/*;q=0.8 Accept-Encoding: gzip, deflate, br Host: www.oschina.net User-Agent: Mozilla/5.0 (Macintosh; Intel Mac OS X 10_15_7 ) AppleWebKit/605.1 .15 (KHTML, like Gecko) Version/14.0 .1 Safari/605.1 .15 Accept-Language: zh-cn Referer: https://www.oschina.net/home/login?goto_page=https%3A%2F%2Fwww.oschina.net%2F Connection: keep-alive
模拟登录
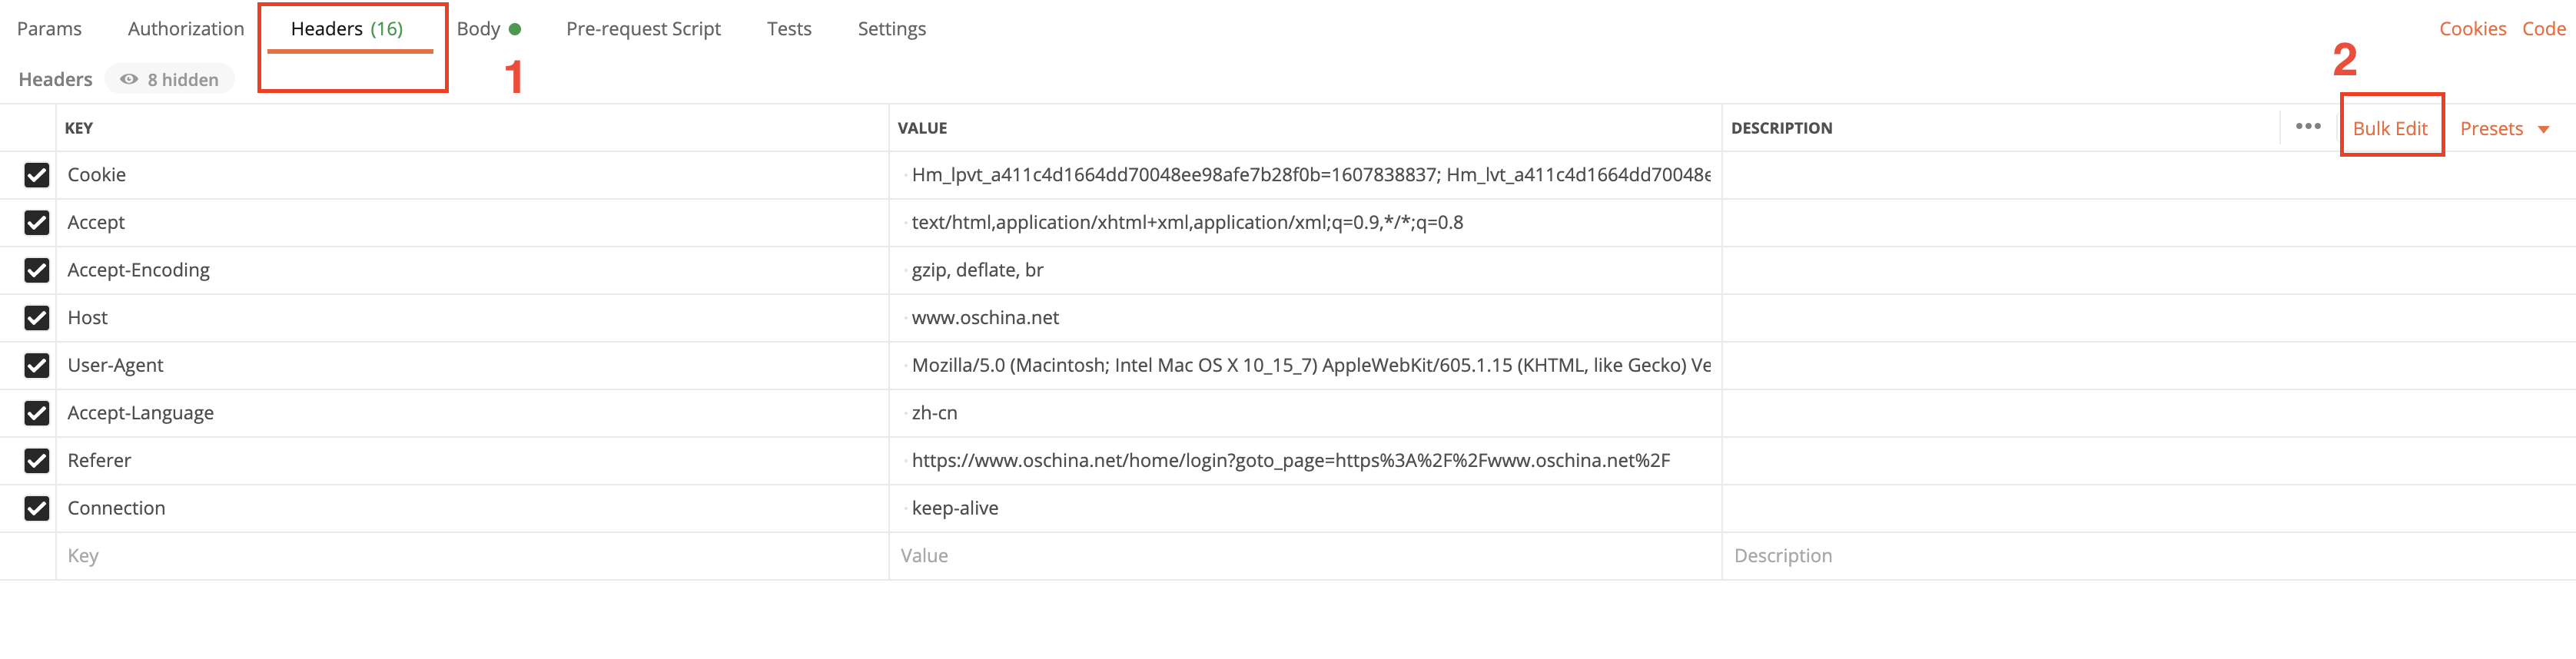
按照下图中的步骤,把 完整的 HTTP 请求头 复制到 postman 中,postman 可以帮你解析成下图中的样式,如果需要可以在这里变更:
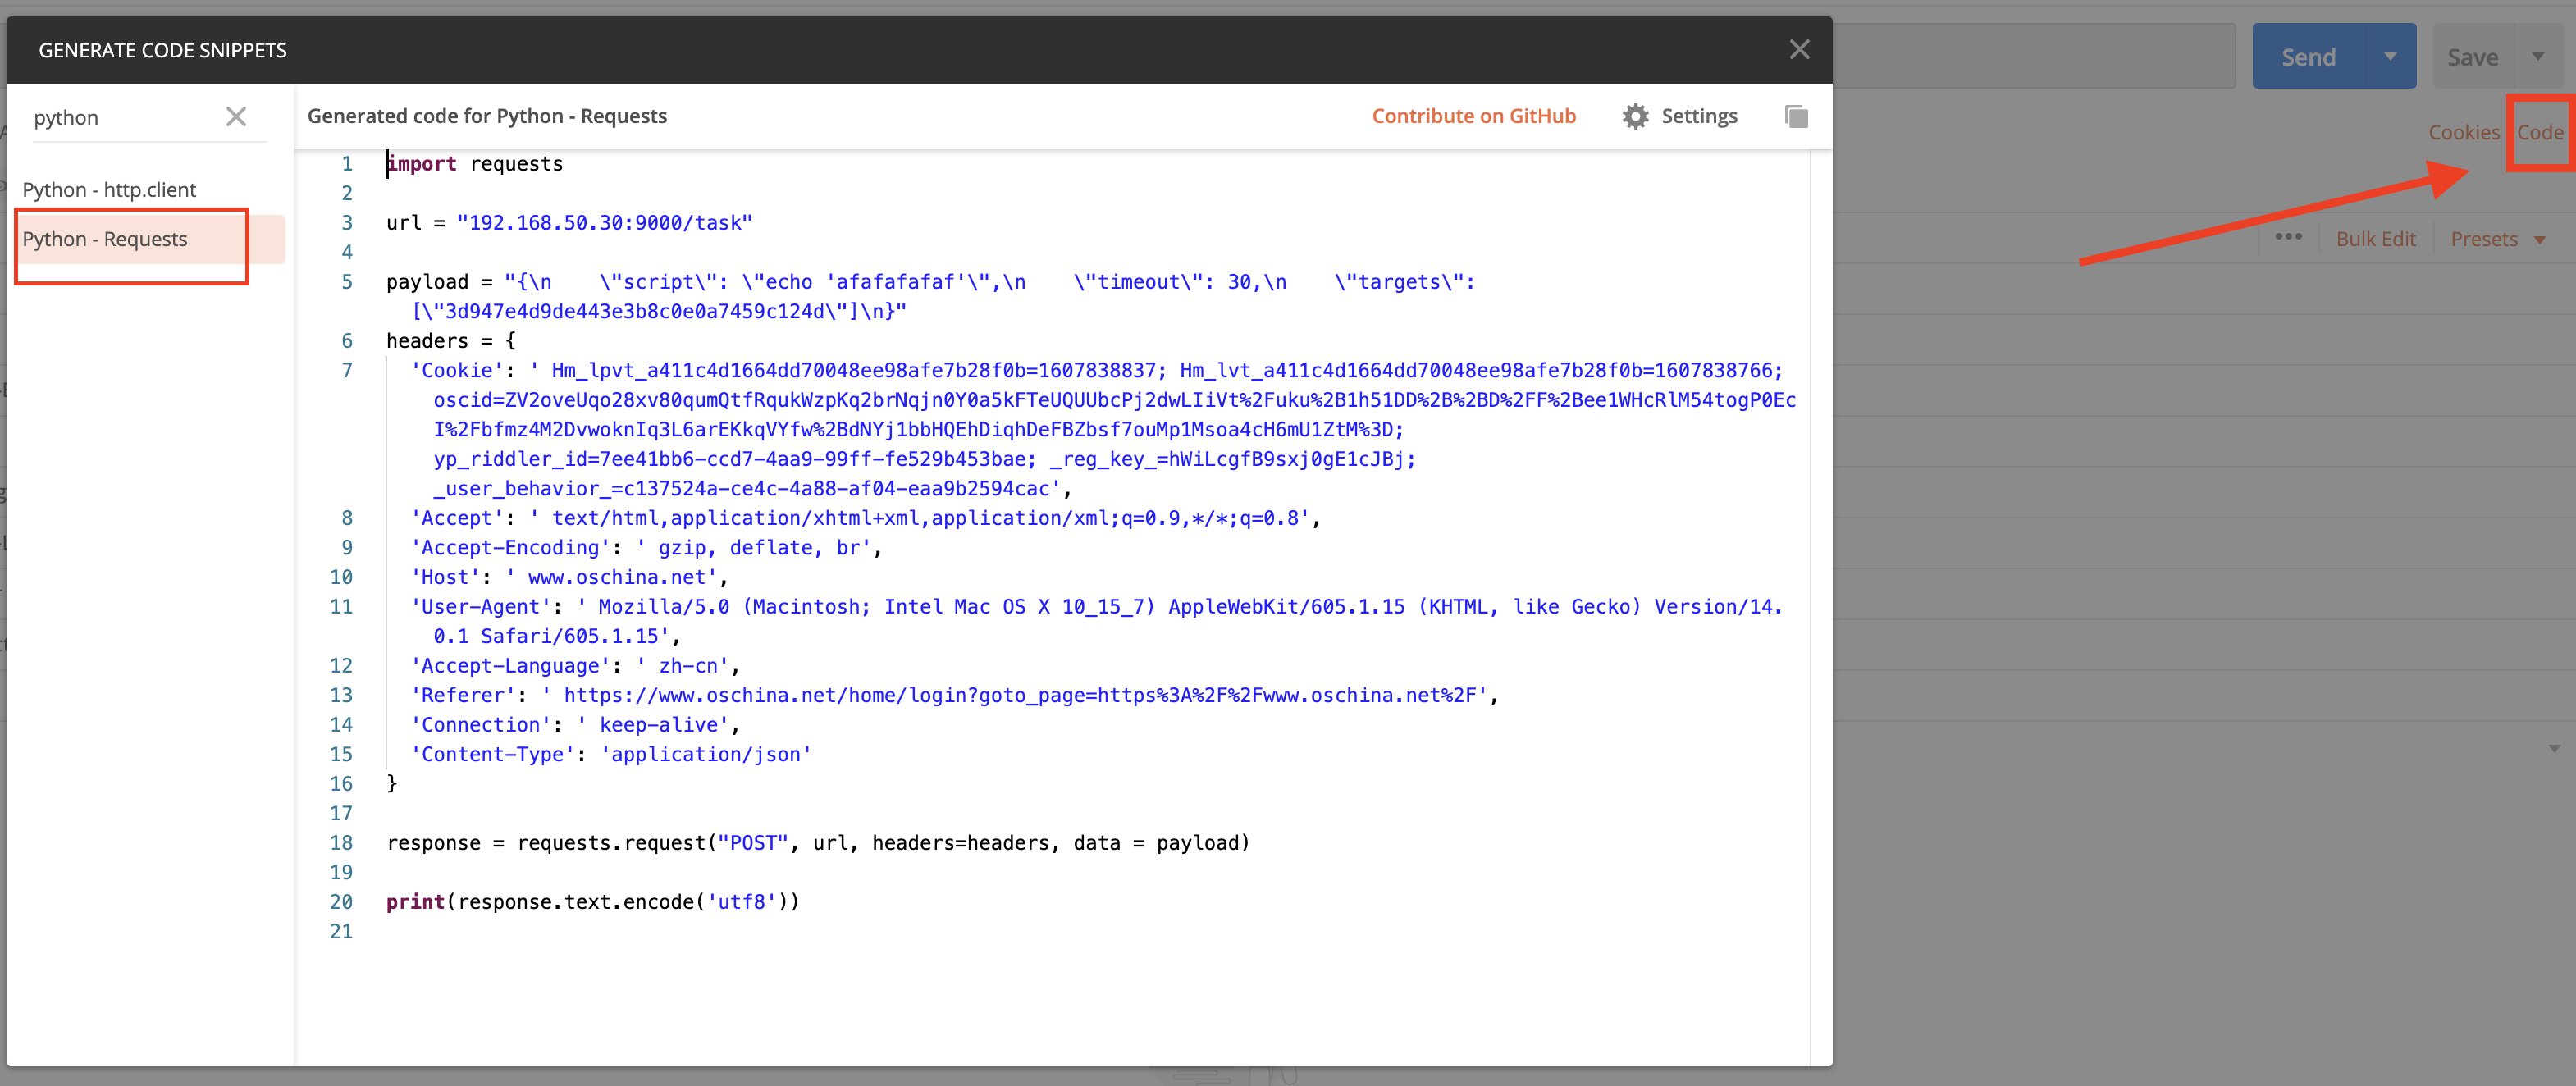
再点击右上角的 code,可以输出成代码,这里选择输出为 python 的 Requests 库:
登录代码实现:
1
2
3
4
5
6
7
8
9
10
11
12
13
14
15
16
17
18
19
20
21
22
23
24
25
26
27
28
29
30
import requestsurl = 'https://my.oschina.net/' headers = { 'Cookie' : 'Hm_lpvt_a411c4d1664dd70048ee98afe7b28f0b=1607855808; Hm_lvt_a411c4d1664dd70048ee98afe7b28f0b=1607838766; oscid=ZV2oveUqo28xv80qumQtfRqukWzpKq2brNqjn0Y0a5kFTeUQUUbcPj2dwLIiVt%2Fu2mYgBOppTdT9KT3uFZFPt9v0S6ydk9KVFuSVCHB9NsCt%2BkT0p954isoFMFKqWdLzKZanWq%2BEp3QJHt51I8Sgzzi8cmYuYVJbGoQMEsF7QV8%3D; _reg_key_=QSd4hX6aHGAGW7wCZvlU; yp_riddler_id=7ee41bb6-ccd7-4aa9-99ff-fe529b453bae; _user_behavior_=c137524a-ce4c-4a88-af04-eaa9b2594cac' , 'Accept' : 'text/html,application/xhtml+xml,application/xml;q=0.9,*/*;q=0.8' , 'Accept-Encoding' : 'gzip, deflate, br' , 'Host' : 'www.oschina.net' , 'User-Agent' : 'Mozilla/5.0 (Macintosh; Intel Mac OS X 10_15_7) AppleWebKit/605.1.15 (KHTML, like Gecko) Version/14.0.1 Safari/605.1.15' , 'Accept-Language' : 'zh-cn' , 'Referer' : 'https://www.oschina.net/home/login?goto_page=https%3A%2F%2Fwww.oschina.net%2F' , 'Connection' : 'keep-alive' , 'Content-Type' : 'application/json' } response = requests.request("GET" , url, headers=headers) with response: with open ('/tmp/profile.html' , 'w' , encoding='utf-8' ) as f: text = response.text f.write(text) print (text) print (response.status_code, '~~~~~~~~~~~~~~~~~~~~' )
查看 HTML:
登录了,会有 class="ui centered header",后边会跟着用户名,这里用户名是 magedu_wayne
未登录,会有 user-bar,里边是 登录 和 注册 等文字。
新浪微博等网站都一样,只要有【记住用户登录状态】的选项,就可以通过上述方法爬取登录后内容。
2. 多线程爬取博客园
博客园的新闻分页地址 https://news.cnblogs.com/n/page/10/ https://news.cnblogs.com/n/page/2/ 这个 url 中,变化的是最后的数字一直在变,它是页码。
访问网站是 IO 密集型操作,适合使用线程,所以采用多线程的方式成批爬取新闻的标题和链接。
代码实现:
1
2
3
4
5
6
7
8
9
10
11
12
13
14
15
16
17
18
19
20
21
22
23
24
25
26
27
28
29
30
31
32
33
34
35
36
37
38
39
40
41
42
43
44
45
46
47
48
49
50
51
52
53
54
55
56
57
58
59
60
61
62
63
64
65
66
67
68
69
70
71
72
73
74
75
76
77
78
79
80
81
82
83
84
85
86
87
88
from concurrent.futures import ThreadPoolExecutorimport requestsimport loggingfrom queue import Queueimport threadingfrom bs4 import BeautifulSoupimport timeFORMAT = "%(asctime)s %(threadName)s %(thread)d %(message)s" logging.basicConfig(format =FORMAT, level=logging.INFO) BASE_URL = 'https://news.cnblogs.com' PAGE_PATH = '/n/page/' event = threading.Event() headers = { 'User-Agent' : "Mozilla/5.0 (Windows NT 6.1) AppleWebKit/537.36 (KHTML, like Gecko) Chrome/55.0.2883.75 Safari/537.36" } urls = Queue() htmls = Queue() outputs = Queue() def create_urls (start, end, step=1 ): """1. 创建 urls,周而复始创建待爬取的 ur1s,塞入 queue""" for i in range (start, end + 1 , step): urls.put('{}{}{}/' .format (BASE_URL, PAGE_PATH, i)) print ('url 创建完毕' ) def crawler (): """2. 从 queue 中获取 url 来发起 request,返回 response""" while not event.is_set(): try : url = urls.get(True , 1 ) with requests.get(url, headers=headers) as response: html = response.text htmls.put(html) except : pass def parser (): """3. 分析数据,提取有用的数据,保存到文件""" while not event.is_set(): try : html = htmls.get(True , 1 ) soup = BeautifulSoup(html, 'lxml' ) titles = soup.select('h2.news_entry a' ) for title in titles: val = title.text, BASE_URL + title.get('href' ) outputs.put(val) except : pass def save (path ): """4. 入库,保存到文件中""" with open (path, 'a+' ) as f: while not event.is_set(): try : text, url = outputs.get(True , 1 ) f.write('{} {}\n' .format (text, url)) f.flush() except : pass if __name__ == '__main__' : executor = ThreadPoolExecutor(10 ) executor.submit(create_urls, 1 , 2 ) executor.submit(parser) executor.submit(save, '/tmp/news.txt' ) for i in range (7 ): executor.submit(crawler) while True : inp = input ('>>>' ) if inp.strip() == 'q' : event.set () executor.shutdown() print ('closing ......' ) time.sleep(3 ) break
3. 动态网页处理 PhantomJS + Selenium
很多网站都采用 AJAX 技术、SPA 技术,部分内容都是异步动态加载的。可以提高用户体验,减少不必要的流量,方便 CDN 加速等。
但是,对于爬虫程序爬取到的 HTML 页面相当于页面模板了,动态内容不在其中。
解决办法之一,如果能构造一个包含 JS 引擎的浏览器,让它加载网页并和网站交互,我们编程从这个浏览器获取内 容包括动态内容。这个浏览器不需要和用户交互的界面,只要能支持 HTTP、HTTPS 协议和服务器端交互,能解析 HTML、CSS、JS 就行了。
PhantomJS
它是一个 headless 无头浏览器,支持 Javascript。可以运行在 Windows、Linux、Mac OS 等。 所谓无头浏览器,就是包含 Js 引擎、浏览器排版引擎等核心组件,但是没有和用户交互的界面的浏览器。
下载对应操作系统的 PhantomJS,解压缩就可以使用。
Selenium
它是一个 WEB 自动化测试工具。它可以直接运行在浏览器中,支持主流的浏览器,包括 PhantomJS(无界面浏览器)。
官网 https://www.seleniumhq.org/
安装:
不同浏览器都会提供操作的接口,Selenium 就是使用这些接口来操作浏览器。
使用 Selenium 工具来控制 PhantomJS 浏览器,是很完美的结合。
Selenium 最核心的对象就是 webdriver ,通过它就可以操作浏览器、截图、HTTP 访问、解析 HTML 等。
其中 webdriver 里包含了各种浏览器的驱动,需要哪个就导入哪个,例如:
1
2
3
4
5
6
from selenium import webdriver driver = webdriver.PhantomJS(r'/app/phantomjs' ) driver = webdriver.Chrome(r'/app/chrome' ) driver = webdriver.Safari(r'/app/safari' ) driver = webdriver.Firefox(r'/app/firefox' )
处理 bing 的异步请求
bing 的查询结果是通过异步请求返回结果,所以,直接访问页面不能直接获取到搜索结果。
下面代码演示如何获取异步请求的结果:
1
2
3
4
5
6
7
8
9
10
11
12
13
14
15
16
17
18
19
20
21
22
23
24
25
26
27
28
29
30
31
32
33
34
35
36
37
38
39
40
from selenium import webdriver import datetimeimport randomimport timedriver = webdriver.PhantomJS(r'/Users/monster/Downloads/phantomjs-2.1.1-macosx/bin/phantomjs' ) driver.set_window_size(1280 , 2400 ) url = "http://cn.bing.com/search?q=%E8%80%97%E5%AD%90%E5%B0%BE%E6%B1%81" driver.get(url) def save_pic (): base_dir = '/tmp/' filename = "{}{:%Y%m%d%H%M%S}{:03}.png" .format (base_dir, datetime.datetime.now(), random.randint(1 , 100 )) driver.save_screenshot(filename) MAXRETRIES = 5 for i in range (MAXRETRIES): time.sleep(2 ) try : ele = driver.find_elements_by_xpath('//li[@class="b_pag"]' ) print (ele) print (i, 'ok' ) save_pic() break except Exception as e: print (e) driver.close()
下拉框处理
Selenium 专门提供了 select 类来处理网页中的下拉框。
不过下拉框用的页面越来越少了,本次使用:https://www.oschina.net/search?scope=project&q=python
需要页面的下拉框是使用了 select 标签的才能使用,类似这样:
1 2 3 4 5 6 <select name ='tag1' onchange ="submit();" > <option value ='0' > 所有分类</option > <option value ='309' > Web应用开发</option > <option value ='331' > 手机/移动开发</option > ... ...
代码实现:(这个网站已经改变,现在无法测试了,暂时还未找到下拉框中使用 selete 标签的网站…太难找了。。。)
1
2
3
4
5
6
7
8
9
10
11
12
13
14
15
16
17
18
19
20
21
22
23
24
25
26
27
28
29
30
31
32
33
34
35
from selenium import webdriver import datetimeimport randomfrom selenium.webdriver.support.ui import Selectdriver = webdriver.PhantomJS(r'/Users/monster/Downloads/phantomjs-2.1.1-macosx/bin/phantomjs' ) driver.set_window_size(1280 , 2400 ) def save_pic (): base_dir = '/tmp/' filename = "{}{:%Y%m%d%H%M%S}{:03}.png" .format (base_dir, datetime.datetime.now(), random.randint(1 , 100 )) driver.save_screenshot(filename) url = "https://www.oschina.net/search?scope=project&q=python" driver.get(url) ele = driver.find_element_by_name('tag1' ) print (ele.tag_name) print (driver.current_url)save_pic() s = Select(ele) s.select_by_index(1 ) print (driver.current_url) save_pic() driver.close()
模拟键盘操作(模拟登录 B 站)
webdriver 提供了一些 find 方法,用户获取一个网页中的元素。元素对象可以使用 send_keys 模拟键盘输入。
模拟登录 B 站:
1
2
3
4
5
6
7
8
9
10
11
12
13
14
15
16
17
18
19
20
21
22
23
24
25
26
27
28
29
30
31
32
33
34
35
36
37
38
39
40
41
42
43
44
45
46
47
from selenium import webdriver import datetimeimport randomfrom selenium.webdriver.common.keys import Keysfrom selenium.webdriver.support.ui import Selectimport timedriver = webdriver.PhantomJS(r'/Users/monster/Downloads/phantomjs-2.1.1-macosx/bin/phantomjs' ) driver.set_window_size(1280 , 2400 ) def save_pic (): base_dir = '/tmp/' filename = "{}{:%Y%m%d%H%M%S}{:03}.png" .format (base_dir, datetime.datetime.now(), random.randint(1 , 100 )) driver.save_screenshot(filename) url = "https://passport.bilibili.com/login" driver.get(url) save_pic() username = driver.find_element_by_id('login-username' ) passwd = driver.find_element_by_id('login-passwd' ) username.send_keys('这里输入测试账号' ) passwd.send_keys('这里输入测试账号的密码' ) save_pic() passwd.send_keys(Keys.ENTER) time.sleep(5 ) save_pic() print (driver.current_url) cookies = driver.get_cookies() driver.close()
页面等待
越来越多的页面使用 Ajax 这样的异步加载技术,这就会导致代码中要访问的页面元素,还没有被加载就被访问了,抛出异常。
方法 1 :线程休眠
使用 time.sleep(n) 来等待数据加载。
配合循环一直等到数据被加载完成,可以解决很多页面动态加载或加载慢的问题。当然可以设置一个最大重试次数,以免一直循环下去。
方法 2 :使用 Selenium 等待,分为:
显示等待,指定一个条件,一直等到这个条件成立后继续执行,也可以设置超时时间,超时会抛异常;
隐式等待,等待特定的时间;
参考:https://www.seleniumhq.org/docs/04_webdriver_advanced.jsp#explicit-and-implicit-waits
显示等待
可用条件:
expected_conditionsn 内置条件
说明
title_is判断当前页面的 title 是否精确等于预期
title_contains判断当前页面的 title 是否包含预期字符串
presence_of_element_located判断某个元素是否被加到了 dom 树里,并不代表该元素一定可见
visibility_of_element_located判断某个元素是否可见. 可见代表元素非隐藏,并且元素的宽和高 都不等于 0
visibility_of跟上面的方法做一样的事情,只是上面的方法要传入 locator,这个方法直接传定位到的 element 就好了
presence_of_all_elements_located判断是否至少有 1 个元素存在于 dom 树中。举个例子,如果页面上有 n 个元素的 class 都是 column-md-3,那么只要有 1 个元素存在,这个方法就返回 True
text_to_be_present_in_element判断某个元素中的 text 是否包含了预期的字符串
text_to_be_present_in_element_value判断某个元素中的 value 属性是否包含了预期的字符串
frame_to_be_available_and_switch_to_it判断该 frame 是否可以 switch 进去,如果可以的话,返回 True 并且 switch 进去,否则返回 False
invisibility_of_element_located判断某个元素中是否不存在于 dom 树或不可见
element_to_be_clickable判断某个元素中是否可见并且是 enable 的,这样的话才叫 clickable
staleness_of等某个元素从 dom 树中移除,注意,这个方法也是返回 True 或 False
element_to_be_selected判断某个元素是否被选中了, 一般用在下拉列表
element_selection_state_to_be判断某个元素的选中状态是否符合预期
element_located_selection_state_to_be跟上面的方法作用一样,只是上面的方法传入定位到的 element,而这个方法传入 locator
alert_is_present判断页面上是否存在 alert
定位豆瓣的搜索框,搜索“漫威”电影列表:
1
2
3
4
5
6
7
8
9
10
11
12
13
14
15
16
17
18
19
20
21
22
23
24
25
26
27
28
29
30
31
32
33
34
35
36
37
38
39
40
41
42
from selenium import webdriver import datetimeimport randomfrom selenium.webdriver.common.keys import Keysfrom selenium.webdriver.support.wait import WebDriverWaitfrom selenium.webdriver.support import expected_conditions as ecfrom selenium.webdriver.common.by import Bydriver = webdriver.PhantomJS(r'/Users/monster/Downloads/phantomjs-2.1.1-macosx/bin/phantomjs' ) driver.set_window_size(1280 , 2400 ) def save_pic (): base_dir = '/tmp/' filename = "{}{:%Y%m%d%H%M%S}{:03}.png" .format (base_dir, datetime.datetime.now(), random.randint(1 , 100 )) driver.save_screenshot(filename) url = "https://movie.douban.com" driver.get(url) try : ele = WebDriverWait(driver, 20 ).until( ec.presence_of_element_located((By.XPATH, '//input[@id="inp-query"]' )) ) ele.send_keys('漫威' ) ele.send_keys(Keys.ENTER) save_pic() finally : driver.quit()
隐式等待
如果查找的元素存在,会直接返回,而当指定的元素找不到报 No Such Element Exception 时,则会智能的等待指定的时长后再找一次。
页面隐式等待:
1
2
3
4
5
6
7
8
9
10
11
12
13
14
15
16
17
18
19
20
21
from selenium import webdriver import datetimedriver = webdriver.PhantomJS(r'/Users/monster/Downloads/phantomjs-2.1.1-macosx/bin/phantomjs' ) driver.implicitly_wait(3 ) driver.set_window_size(1280 , 2400 ) url = "https://movie.douban.com" driver.get(url) try : print ('begin-------' ) start = datetime.datetime.now().timestamp() ele = driver.find_element_by_id('~~~~db-nav-movie' ) except Exception as e: print (type (e)) print (e, '~~~~~~~~~~' ) finally : print (datetime.datetime.now().timestamp() - start) driver.quit()
Selenium 总结
Selenium 的 WebDriver 是其核心,从 Selenium2 开始就是最重要的编程核心对象,在 Selenium3 中更是如此。
和浏览器交互全靠它,它可以完成:
打开 URL,可以跟踪跳转,可以返回当前页面的实际 URL;
获取页面的 title;
处理 cookie 控制浏览器的操作,例如前进、后退、刷新、关闭,最大化等;
执行 JS 脚本;
在 DOM 中搜索页面元素 Web Element,指定的或一批,find 系方法;
操作网页元素;
模拟下拉框操作 Select(element);
在元素上模拟鼠标操作 click();
在元素上模拟键盘输入 send_keys();
获取元素文字 text;
获取元素的属性 get_attribute()。
Selenium 通过 WebDriver 来驱动浏览器工作,而浏览器是一个个独立的浏览器进程。