关于 Ansible 系列其他文章的传送门
-
《 Ansible 介绍和基础操作 》
-
《 Ansible Playbook 以及 Roles 的简单使用方法 》
-
《 使用 Ansible Playbook 通过 yum 部署 LNMP 环境 》
-
《 使用 Ansible Roles 快速搭建 Nginx 代理后端的 LAMP 模型 》 您当前所在位置
-
《 使用 Ansible Playbook 自动完成硬盘的分区、格式化、挂载 》

一、准备环境
记录使用 Ansible Roles,部署 Nginx 反向代理 LNMP 的方法
系统:三台 CentOS 7.6.1810
| 功能 |
Hostname |
IP |
| proxy |
centos_1 |
192.168.50.11 |
| LAMP |
centos_2 |
192.168.50.12 |
| LAMP |
centos_3 |
192.168.50.13 |
- Ansible 版本:ansible 2.8.0
- 全部关闭 selinux
- 全部安装好 epel 源
需要通过剧本来安装的程序有:
- nginx 安装在第一台,用来把请求反向代理至后端节点
(以下四个安装在其他两台,组成 LAMP 来处理请求)
- httpd
- php-fpm
- php-mysql
- mariadb-server
二、准备配置文件
先创建好目录结构:
1
| mkdir -pv /etc/ansible/roles/{nginx,httpd}/{files,templates,tasks,handlers,vars}
|
所有 ansible 文件如下:
1
2
3
4
5
6
7
8
9
10
11
12
13
14
15
16
17
18
19
| roles
│
├── httpd
│ ├── files
│ ├── handlers
│ │ └── main.yml
│ ├── tasks
│ │ └── main.yml
│ ├── templates
│ │ └── index.j2
│ └── vars
└── nginx
├── files
│ └── proxy.conf
├── handlers
├── tasks
│ └── main.yml
├── templates
└── vars
|
1. nginx 端的配置文件如下
nginx 的 tasks 配置文件
1
2
3
4
5
6
7
8
9
10
11
12
13
14
15
16
| root@centos_1 ~
- name: stop firewalld packages
service: name=firewalld state=stopped enabled=no
- name: install nginx
yum: name=nginx
- name: make dirctory
file: path=/etc/nginx/default.d state=directory
- name: copy proxy conf
copy: src=proxy.conf dest=/etc/nginx/default.d/proxy.conf
- name: restart nginx
service: name=nginx state=restarted
|
proxy 配置文件
将 centos_2 和_3 的请求分别反代至 50.12 和 50.13
1
2
3
4
5
6
7
8
| root@centos_1 ~# cat /etc/ansible/roles/nginx/files/proxy.conf
location /centos_2/ {
proxy_pass http://192.168.50.12/;
}
location /centos_3/ {
proxy_pass http://192.168.50.13/;
}
|
2. httpd 端的配置文件如下
httpd 的 tasks 配置文件
1
2
3
4
5
6
7
8
9
10
11
12
13
14
15
16
17
18
19
20
21
22
23
24
25
26
27
| root@centos_1 ~# cat /etc/ansible/roles/httpd/tasks/main.yml
- name: stop iptables firewalld packages
service: name=firewalld state=stopped enabled=no
- name: install packages
yum: name={{ item }} state=installed
loop:
- httpd
- php
- php-mysql
- name: install mysql
yum: name=mariadb-server state=installed
notify:
- set mysql-1
- set mysql-2
- set mysql-3
- name: install php index
template: src=index.j2 dest=/var/www/html/index.php
- name: restart services
service: name={{ item }} state=restarted
loop:
- mariadb
- httpd
|
index 模板文件
1
2
3
4
5
6
7
8
9
10
11
12
13
14
15
16
| root@centos_1 ~# cat /etc/ansible/roles/httpd/templates/index.j2
<?php
$servername = "localhost";
$username = "root";
$password = "123qwe";
$conn = new mysqli($servername, $username, $password);
if ($conn->connect_error) {
die("{{ ansible_hostname }}连接失败: " . $conn->connect_error);
}
echo "{{ ansible_hostname }} 连接成功";
?>
|
handlers 配置文件
设定 mysql 的相关权限
1
2
3
4
5
6
7
| root@centos_1 ~# cat /etc/ansible/roles/httpd/handlers/main.yml
- name: set mysql-1
command: mysql --execute="UPDATE mysql.user SET Password=PASSWORD('123qwe') WHERE User='root';"
- name: set mysql-2
command: mysql --execute="UPDATE mysql.user SET host='%' WHERE host='localhost';"
- name: set mysql-3
command: mysql --execute="FLUSH PRIVILEGES"
|
三、设定 Roles 并执行 Playbook
1. 剧本
超级简单,定义好 hosts 和 roles 就可以跑了
1
2
3
4
5
6
7
8
9
10
11
| root@centos_1 ~# cat /root/lnmp/roles/proxy_lnmp.yaml
- hosts: proxy
remote_user: root
roles:
- nginx
- hosts: web
remote_user: root
roles:
- httpd
|
2. 执行剧本
接下来执行命令,“一键” 安装 nginx 代理 lamp 环境
可以先用 ↓ 测试语法
1
| ansible-playbook --syntax-check
|
↓ 干跑
↓ 正式运行
1
2
3
4
5
6
7
8
9
10
11
12
13
14
15
16
17
18
19
20
21
22
23
24
25
26
27
28
29
30
31
32
33
34
35
36
37
38
39
40
41
42
43
44
45
46
47
48
49
50
51
52
53
54
55
56
57
58
59
60
61
62
63
64
65
66
67
68
69
70
| root@centos_1 ~# ansible-playbook lnmp/roles/proxy_lnmp.yaml
PLAY [proxy] ******************************************************************************
TASK [Gathering Facts] ********************************************************************
ok: [192.168.50.11]
TASK [nginx : stop firewalld packages] ****************************************************
ok: [192.168.50.11]
TASK [nginx : install nginx] **************************************************************
changed: [192.168.50.11]
TASK [nginx : make dirctory] **************************************************************
changed: [192.168.50.11]
TASK [nginx : copy proxy conf] ************************************************************
changed: [192.168.50.11]
TASK [nginx : start nginx] ****************************************************************
changed: [192.168.50.11]
PLAY [web] ********************************************************************************
TASK [Gathering Facts] ********************************************************************
ok: [192.168.50.12]
ok: [192.168.50.13]
TASK [httpd : stop iptables firewalld packages] *******************************************
ok: [192.168.50.12]
ok: [192.168.50.13]
TASK [httpd : install packages] ***********************************************************
changed: [192.168.50.13] => (item=httpd)
changed: [192.168.50.12] => (item=httpd)
changed: [192.168.50.13] => (item=php)
changed: [192.168.50.12] => (item=php)
changed: [192.168.50.13] => (item=php-mysql)
changed: [192.168.50.12] => (item=php-mysql)
TASK [httpd : install mysql] **************************************************************
changed: [192.168.50.13]
changed: [192.168.50.12]
TASK [httpd : install php index] **********************************************************
changed: [192.168.50.13]
changed: [192.168.50.12]
TASK [httpd : start services] *************************************************************
changed: [192.168.50.13] => (item=mariadb)
changed: [192.168.50.12] => (item=mariadb)
changed: [192.168.50.12] => (item=httpd)
changed: [192.168.50.13] => (item=httpd)
RUNNING HANDLER [httpd : set mysql-1] *****************************************************
changed: [192.168.50.12]
changed: [192.168.50.13]
RUNNING HANDLER [httpd : set mysql-2] *****************************************************
changed: [192.168.50.13]
changed: [192.168.50.12]
RUNNING HANDLER [httpd : set mysql-3] *****************************************************
changed: [192.168.50.13]
changed: [192.168.50.12]
PLAY RECAP ********************************************************************************
192.168.50.11 : ok=6 changed=4 unreachable=0 failed=0 skipped=0 rescued=0 ignored=0
192.168.50.12 : ok=9 changed=7 unreachable=0 failed=0 skipped=0 rescued=0 ignored=0
192.168.50.13 : ok=9 changed=7 unreachable=0 failed=0 skipped=0 rescued=0 ignored=0
|
3. 检查效果
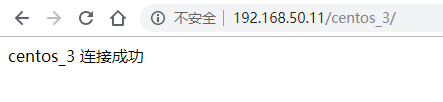
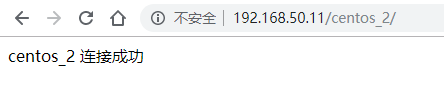
运行完成后,打开本地浏览器,分别输入 ip 地址,验证 php 和 mysql 连通情况
至此,通过 Ansible Roles 部署 Nginx 代理 LAMP 大功告成!!!完结撒花 \(^o^)/